When Bonnie from Fishsticks Designs asked me if I wanted to try her great Charlie Tee & Hoodie pattern , I jumped at the chance! I’m always looking for toddler boy sewing ideas. (On that note, don’t forget to check in at Dana Made It for Celebrate the Boy Month!)
Anyway, Bonnie sent me this pattern for free, but I’m under no obligation to give it a glowing review. I don’t need obligation: this handy little pattern sells itself! I truly, truly love it and I think it’s probably my favorite thing I’ve made for Max so far. The Pattern
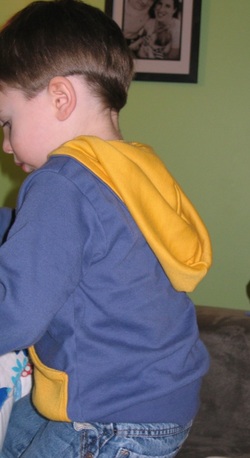
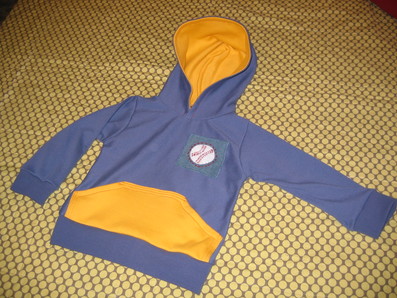
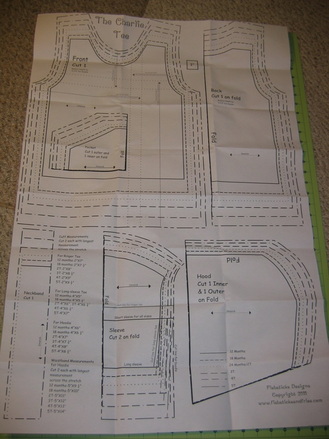
The pattern presentation isn’t fancy (a manila envelope with black and white sheets) [little update here: Bonnie just changed out the packaging! See it here!], but that’s unimportant to me. I’m after functionality and a good pattern, and this definitely delivers. First, it’s about five different patterns in one, because you can customize it for what you want: a plain tee (long or short sleeves), a color-blocked tee, or a hoodie (either outerwear or more like a tee-shirt). I chose the tee-shirt hoodie option, because I wanted Max to have something to wear around for spring that wasn’t too heavy.
She offers the patterns in different sizes (all the way up to adult), and my pattern is for infant/toddlers. There are six sizes: 12M, 18M, 24M/2T, 3T, 4T, 5T
It comes with one big sheet of paper, with all of the sizes clearly printed. The best method is to trace the size you’re making. This way, you don’t have to deal with cumbersome paper when cutting out, and also, you can re-use (I anticipate using this pattern for many years as Max grows!). I used Pellon True-Grid (I just buy this by the bolt at Jo-Ann’s).
The Directions
The directions are very clear. I admit, I didn’t always read them word for word because once you know how to do something your way, you just go ahead and do it without really checking (though I don’t think my way differed from her way). But it would be very appropriate for a beginner. Also, she gives serge directions, if you’re using a serger (I wasn’t). There are accompanying pictures that illustrate the steps, and overall, it’s easy to follow. 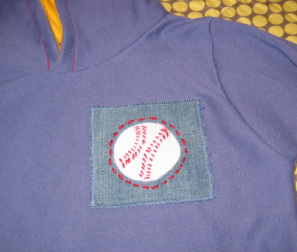
What I Customized
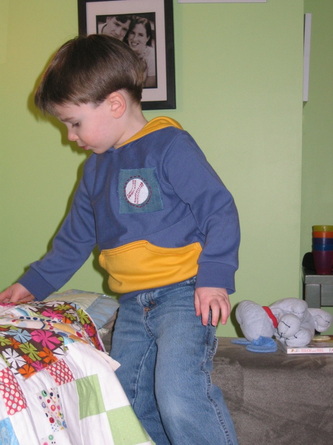
I decided to make a little baseball appliqué. So, this was my addition, there aren’t directions for this in the pattern. But there’s nothing to it: I just cut a piece of white felt into a circle and stitched it (by hand) to a square of denim. Then I took small stitches with a single strand of red yarn to mimic the stitches on a baseball (I actually had to Google images of baseballs to see what a baseball actually looked like!). I made a row of hand stitches with the red yarn just outside the baseball, and then I machine-appliquéd the piece of denim to the front.
I also added more top-stitching to the big yellow pocket, because I wanted to bring out the red. I top-stitched around the hood, too.
 The Overall Fit
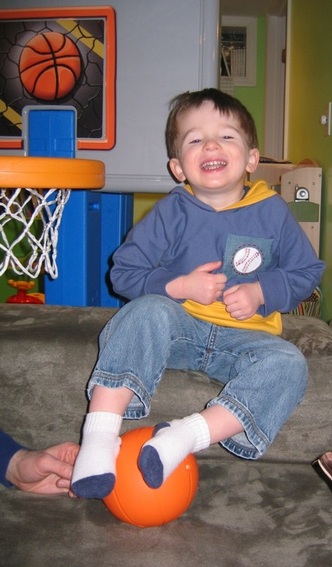
I made a 3T for Max, who is 2-1/2 years old, and a little bit on the small side (he’s like 35% percentile in height/weight). It’s just slightly big, but I like that, because there’s room to grow (I think it will still fit him this fall). It's a nice slim fit (and the waist cuff helps streamline it even more), but it's certainly not too tight. The only little thing: the neck opening is a bit snug. I like this from a fit perspective, but it does make getting it on and off him a bit tight (keep in mind, I did the hoodie version; I don’t think this would be an issue with the regular tee). It’s easier to flip it around and put his head in backwards and then flip it around to the front. When I make it again, I think I’ll cut the neckline just slightly bigger. But this is really no big deal.
The Charlie Tee & Hoodie is priced at $11.25. I know there are a lot of free patterns and tutorials online (which is awesome!), but it’s worth paying for a really great, well-designed pattern that you can use over and over again. I’ll certainly return to this one again, and will probably girl it up and make it for Georgia this fall, too! Oh, one last thing: If you're nervous about working with knits, check out Bonnie's blog post answering questions about sewing knits
So here we are in March! March is a little bit wonderful and a little bit rotten—it teases you with sunshine and then dumps some cold weather on you just for sport. But I’m keeping a good thought for spring!
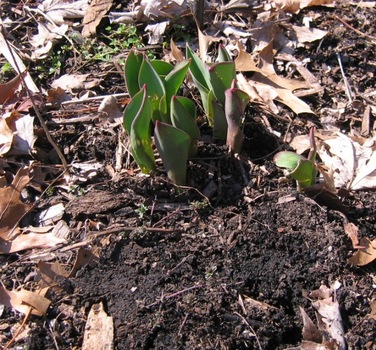
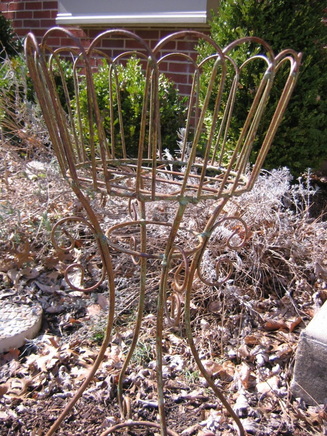
A few snapshots from my garden:
Tulips soon to make their entrance . . . .
A basket soon to be filled with annuals . . .
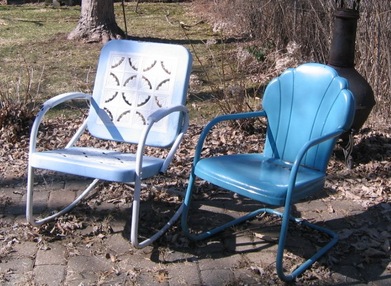
Chairs soon to be rocked . . .
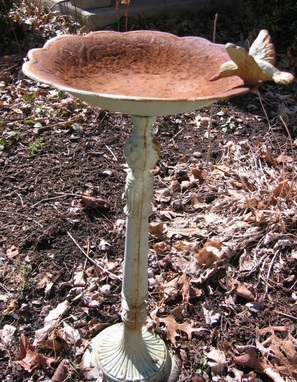
A birdbath soon to be splashed in . . .
Despite its fickle weather, March is a great month for celebrations. I mean, it’s National Craft Month and Women’s History Month! Women, history, sewing: Could there be a more perfect combo? Hmm, if only there was a book about this or something, right?
Anyway, I was honored to write a guest blog about the history of women and sewing for the lovely Natalie over at the Craftzine blog. Check it out here, and put in your two cents if you get a chance!
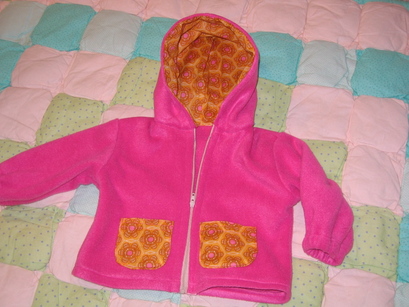
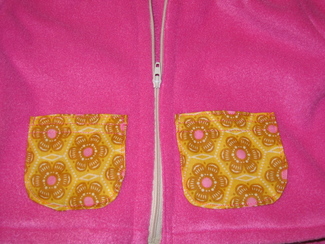
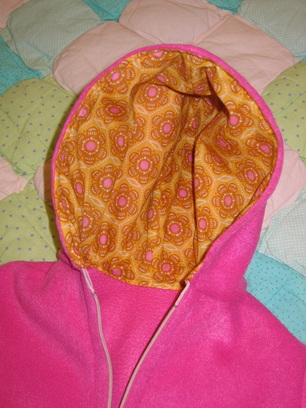
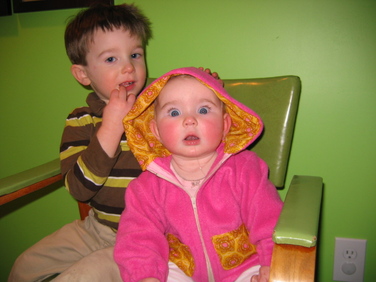
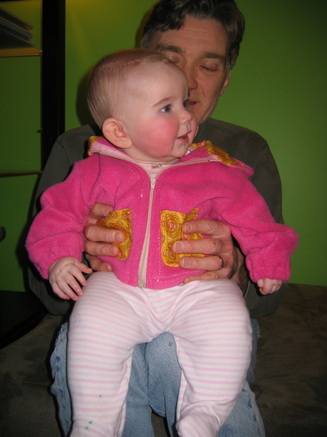
Also, I decided March was the month that my little baby girl should finally have, you know, a jacket (we just relied on blanket-bundling to get through the winter). I found a fleece as a remnant at Jo-Ann’s and it had pink prettiness written all over it. I used Simplicity pattern 5316 , but modified it some. I used an Anna Maria Horner print (one of the prints that came in the fabric stack) to make the pockets and to line the hood (the pattern doesn’t call for lining the hood, but I wanted the fun contrast). It’s an easy pattern to follow, and even if you’ve never done a separating zipper, the directions walk you through it very well (it had been a few years since I did one). It gets mighty bulky at the bottom, but just solider through it and even if it’s slightly crooked, it will still be okay. So, let's all channel spring and the amazing stories of women throughout history. And maybe go make a pretty spring jacket for yourself (or your kid) if you don't have one! It will make you happy, I promise.
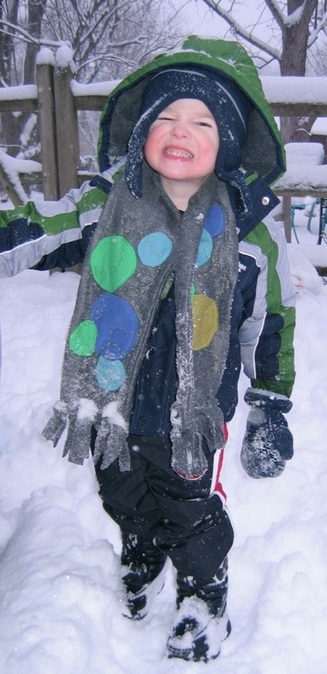
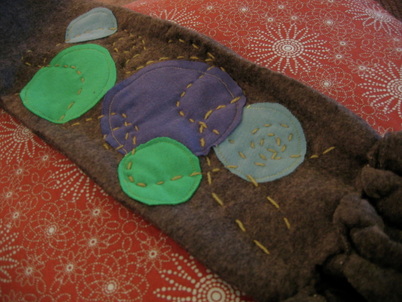
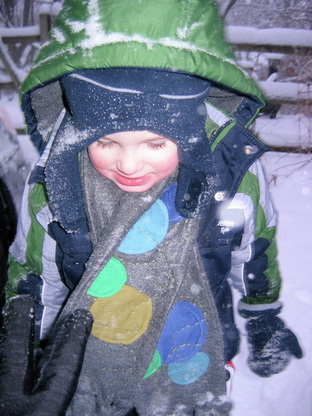
I don’t like winter, but I live in Cincinnati. So I’m pretty much out of luck. The only good thing about winter is the clothes—layers of fleecy, wooly, tweedy warmth. We bought Max his first real big boy winter coat a few months ago, along with hats, gloves, and boots. But it never occurred to me to get a scarf for him. So when I spotted this piece of grey fleece in my sewing basket one impossibly cold Sunday morning, I knew exactly what to do with it. The circles remind me of blowing bubbles, and I picked colors that would match his coat. I used all knit fabric, but you could use whatever is on hand (I actually think using a woven cotton and then fraying the edges would look really great). You could probably look at this and figure out intuitively how to do it. But here are the basic steps in case you want to know how I did it.
1. First, cut two pieces of fleece, each about 46 inches by 6-1/2 inches (or whatever length you want the scarf—I wanted some definite length).
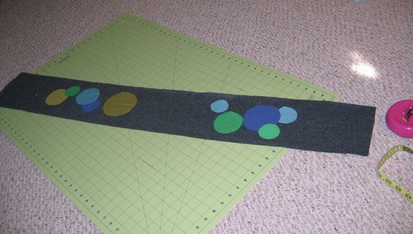
2. Next, cut out a bunch of circles of different sizes and in different colors (trace whatever you have on hand to create circles).
3. Arrange your circles on the scarf front; keep at least 1/2-inch on each side (room for seams) and about six inches at each bottom (for the fringe). 4. To appliqué, you can use Wonder-Under. I think my Wonder-Under was too old (and ruined from spending the summer in my hot attic office), so instead, I just dabbed some fabric glue to hold the circles until I stitched.
5. I sewed around the circles with a basic straight stitch, because I wanted a rough, uneven look. But you could also do a zigzag or appliqué stitch. Or if you want a clean-edged look, follow Anna Maria Horner’s directions for super circles.
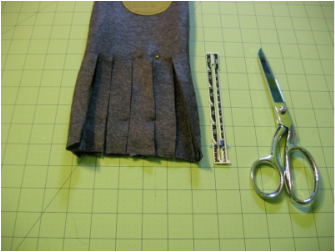
6. Sew up the sides of your two pieces of fleece (right sides together). Leave both ends open.
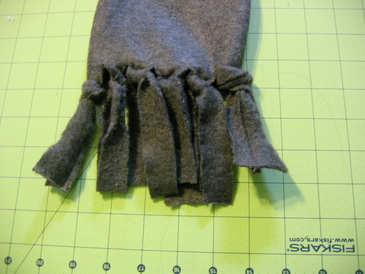
7. Turn and press well. 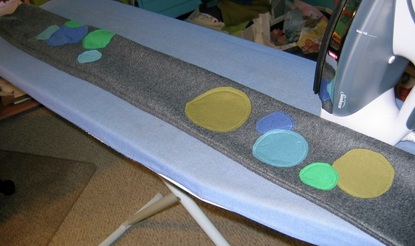 Don't forget to press after you turn so the scarf's side edges are nice and crisp. Ignore all of the crap in the background, please. 8. Align the rough edges at the ends and make four or five cuts about 5 - 6 inches deep, about 1 to 1-1/2 inches apart. 9. Tie the ends together to make fringe. Trimming the seam will help the end piece be less bulky. Don’t pull it too tight because it’s easy to stretch. My fringe is never perfect, so I just trim it until it’s even. (I’m sure there are more exacting ways to do this, but it’s for a wild toddler in the snow, so I’m not too worried.) 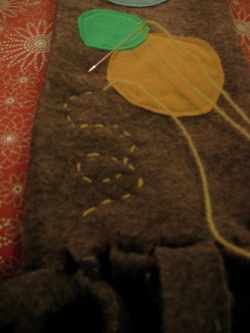 10. Add stitching detail. The stitching detail on the outside is actually my favorite part of this scarf! Last year, I won some pretty green yarn at Purl Soho (I was lucky enough to be there the day of their grand re-opening). I wasn’t sure what to do with it until I was trying to figure out how to add some more personality to this scarf. I decided to pull apart the strands and use a single strand (you pretty much have to use a needle threader to get it to go through the eye of an embroidery needle). I just freehanded the fun, curling stitches. (I’m not that great of a hand sewer, and it’s actually very easy to do.)
The hand-stitching looks good, and it holds the layers together. You could freehand some machine stitching of course, too.
May your winter be toasty!
 Throughout the year, I’m going to do a series of quick ideas for boys’ clothes/accessories (sometimes a free pattern, sometimes a pattern review, and sometimes a quick modification or easy embellishment). There’s no shortage of ideas out there for girls’ sewing (ribbon and rickrack and rosettes!), but the creativity needs a bit more coaxing for boys (at least in my opinion). One problem is that because pattern books and magazines show so few boys wearing even the gender-neutral stuff (like T-shirts), it’s easy to overlook these patterns and think it’s just all girls’ stuff.
Today, I’m offering the first two Boy Sewing Brainstorms!
Boy Sewing Brainstorm #1:
Make faux-layered sleeves for a t-shirt.
I’m cheating a little because I already blogged about this when I talked about making this Simplicity T-shirt pattern (Simplicity 5317). I love the look of layered sleeves, and though I wear this look myself, there is something particularly boy about it. It can transform a blah t-shirt into an interesting T-shirt. It’s also a great way to use up little bits of knit fabric. Read about how to do it here. Boy Sewing Brainstorm #2Add an embroidered patch to a t-shirt. Yes, one more T-shirt idea (what can I say? Boys wear a lot of T-shirts). Once again, this is my favorite Simplicity T-shirt pattern, again with faux-layered sleeves. But to individualize this one a bit, I decided to make a special “All-Star” patch. Instead of using a font and printing it out, I wrote it out myself (because I wanted a genuinely handwritten look) and drew the little star (unevenness adds character, after all). I transferred it using embroidery transfer paper (I used DMC brand, but will use some from Sublime Stitching next time). 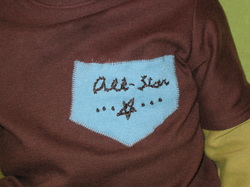 Then, I embroidered it, using a simple split stitch, and added the French knots on each side. (I think I’ll invest in some of Sublime’s Stitching’s T-shirt stabilizer next time though, because I found it challenging to embroider on knit and didn't do the best job with my stitches.) I put some TrueGrid over top the finished embroidery and cut it in the shape of a pentagon and then cut out my patch. I just used a machine applique stitch to attach.If you come across great boy sewing ideas (which are certainly out there--I'm in the process of collecting them myself), feel free to leave a comment and link and I'll repost.
Okay, so this picture of my little Georgia really has nothing to do with this post, but it's so cute, I can't resist!Now that 2010 is coming to a close, I'm ready to start thinking about 2011 and where I want to take my business, as well as this blog. Some writer friends of mine have been discussing our Wildly Improbable Goals for 2011 (I believe life coach Martha Beck has coined this phrase). I think my WIG for 2011 is to launch a line of patterns. Having this as my WIG helps me focus my efforts a little better, and understand what skills I need to work on. For the first time in a while, I'm excited about the possibilities (instead of being bummed out by the limitations of the freelance writing industry).As part of that, I want to keep providing insightful and helpful blog content. Here are just a few things I have planned for 2011 (both specific and general):- A Q&A and giveaway with Anna Maria Horner (coming very soon!)
- More Q&As and giveaways with designers (I love doing Q&As because I get to ask people I admire all kinds of questions I'm dying to know!)
- A roundup of good places to find ideas for sewing for boys (working on this now).
- More free pattern downloads and tutorials, particularly in the area of toddler boys' clothing/accessories, such as the toddler apron pattern I just developed. I'm seeing a real hole in the industry here (as I work on the above-mentioned roundup). And since I have a toddler boy, I want to do my part to fill that hole! My next goal is developing a good toddler fleece vest pattern.
- More book/pattern reviews.
- More advice and tips about craft book publishing.
- More discussions about the history/evolution of sewing and how that history is still impacting the lives of women and our decisions and opportunities.
I feel good about 2011, and I hope you do, too. Happy New Year!
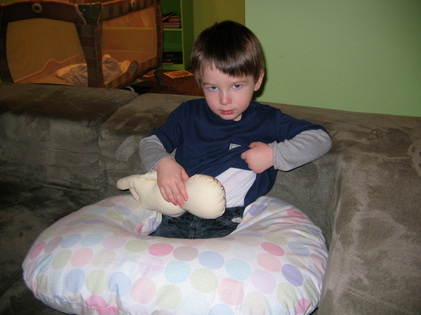
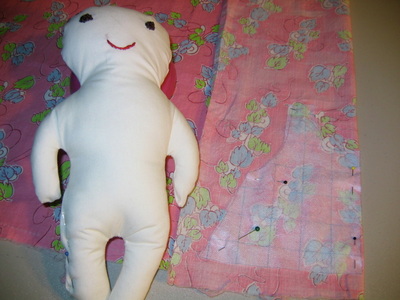
When I was expecting Georgia, I made this doll (from Anna Maria Horner’s Handmade Beginnings) for Max—to "practice" being a big brother. He didn’t pay much attention to it at the time, but in the last few weeks, he has had a renewed interest in it. He loves to imitate everything I do, including “nursing” (as shown above!) his baby, changing her diaper (he insists on getting a wipe), swaddling her, and putting her down for a nap. For Christmas, I decided to make another baby doll to give to my niece, who is about to turn one-year-old. Max doesn’t seem to be interested in dressing his baby, but I thought it would be nice to make a dress for the gifted baby doll. Creating the pattern for the dress was . . . interesting! 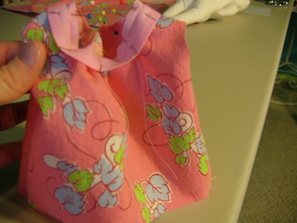 At first, I thought there was no way it was going to work. But slowly, it started to come together, tiny gathering stitches and ruffles and neck binding and all.
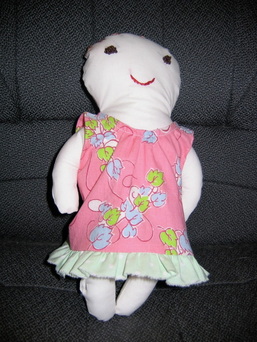 And now, Dolly has her very own dress, made from a vintage feed sack (got it on eBay for $3). I could offer a tutorial (and my make-do pattern piece) if people are interested? But it’s a pretty specific thing, and first people would have to make the doll from Anna Maria’s book (which I’ve written about before, and seriously cannot recommend enough!). I’d do it if I thought there was any interest. Drop me a line if you want the pattern!
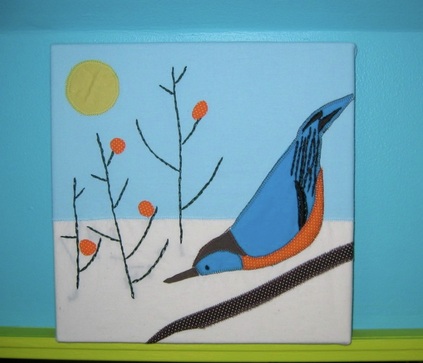
Okay, my crankiness seems to have passed (even though there’s like 4 inches of snow out there on the first day that I actually feel well enough to go running. Grr …). Going to “Crafty Christmas” yesterday (a little event organized by my friend Tricia, who is the most amazing cook/baker), and seeing all the lovely creations that people made, definitely lifted my spirits. My contribution was this Charley Harper-inspired bird collage. 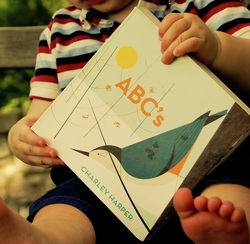 I knew that, like me, my secret Santa recipient was a big Harper fan, so I thought she might appreciate this re-imagining of the Harper print that graces the cover of the ABC book. It’s a combination of embroidery and machine-appliqué on muslin, and then I stretched the muslin across a 12” by 12” canvas and used a staple gun to secure. It’s my first attempt at doing a collage stretched across canvas like this, so I’m pretty happy with it.
One thing I still need to improve upon is the backside of my embroidery. I never pay much attention to how messy it gets because I figure that no one will ever see it. However, because I used a pretty thin muslin, and because the muslin is stretched so snugly across the canvas, the backside does show through! So all of my knots and jumble of stops and starts are sort of visible. My husband was sweet and said it just looks like shadows on the snow, so I’m going with that!
I bought a pack of two canvases at Michael’s, so I still have one left. I’m anxious to try my hand at this project again using a different Harper print for inspiration.
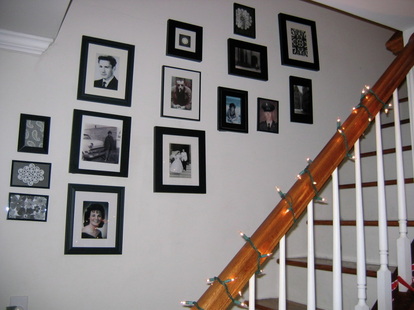
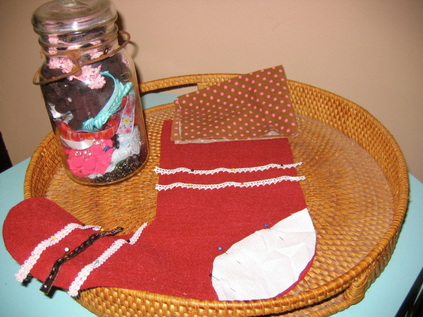
When I was contemplating having a second baby, one of the random, silly thoughts that went through my mind was: “But we only have room to hang THREE stockings from the shelf! Where will the fourth go?” Okay, so ultimately it wasn’t a deal-breaker. I mean, if paying out of pocket because insurance for self-employed people doesn’t cover maternity (yes, I’m serious, and no, I don’t know why this is even legal) isn’t a deal-breaker, a little piece of decorated felt shouldn’t be, right? But I digress . . . 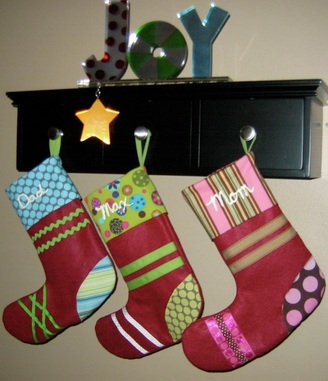 Only 3 knobs! What to do? Okay, so this year with my new family of four, I actually DID have to think about where to put our stockings. I definitely wanted all four to hang side-by-side. I settled on the steps, which turned out to be perfect since the wall behind holds my prized collection of black and white photos of my parents and my husband's parents. 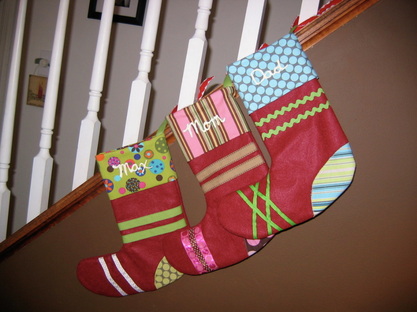 New home on the stairs But now I have to actually make little Georgia’s stocking. At first, I wanted it to be sooo ridiculously pink and girly because, hey, I have a girl now! But then I restrained myself—a little. I’m working on sewing the trim on as we speak . . . 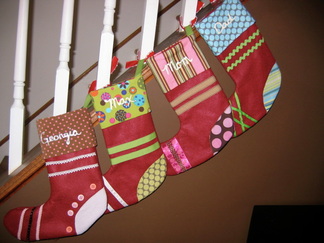 And now I'm finished! Four just has better symmetry than three!
I’ve loved making these stockings for all of us. It’s an amazingly simple pattern, and you can embellish the front in any creative, crazy, or traditional way you want. I just added it as a Bonus Project on the site and you can find it right here (including the templates, which you can download as a PDF).
We love Charley Harper at my house. I first discovered Harper when I interviewed Todd Oldham a few years ago. I asked Oldham (who I sort of worship) who some of his design influences were, and he mentioned Charley Harper. At the time, I hadn’t heard of Harper, but of course, I pretended I knew exactly who he was (“oh sure, he’s FABulous!”). But the only Charley Harper I knew was Charlie Sheen’s totally annoying character on that sitcom with the kid. So I immediately looked him up, and was a smitten kitten within minutes (not to mention, I learned that he’s from right here in Cincinnati!). I love Harper’s sense of whimsy and his use of color and contrast. He draws a bird like none other. So it made sense that when my husband and I were ready to invest in some real art for our house, Harper was the first place we turned!  Harper prints above the T Oldham sofa 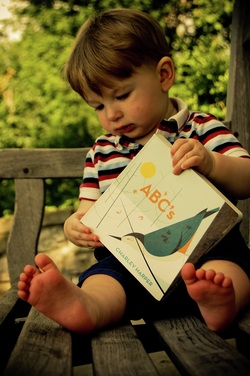 I also love the Charley Harper ABC book and the 1,2,3 book. We started reading them before bed early on, and Max really loves looking through them now. He’s even starting to recognize Harper’s work when he sees it elsewhere. For example, we got a postcard from Fabulous Frames and Art (the best place in Cincinnati to buy Harper) announcing their upcoming Harper show. I showed the postcard to Max and said, “who do you think drew these pictures?” He thought for a minute, and then yelled: “Tarley Harpuhhh!”
I did this Harper-inspired project in Sew Retro, and it got me thinking about other Harper-inspired projects I might try. I’ve decided to do some Harper-inspired fabric/embroidery collages and give them as holiday gifts. I’m still working out the details (strangely, I’ve noticed that I do a lot of my best project thinking at 5 a.m. when I’m lying there nursing Georgia, wavering between sleep and wakefulness). I’m going to use some of the same transfer and appliqué techniques I used to make the Clifford quilt, but on a much smaller scale. Will post the final result . . .
See me talk about Sew Retro, and demonstrate how to make a yo-yo on the Fox 19 Morning Show (Cincinnati).
|


 RSS Feed